

Table of Contents
- Why picking the right order block matters
- What is the inducement zone?
- Core signals: liquidity and imbalance
- The inducement strategy — step by step
- Real trade walkthrough
- Execution checklist
- Common mistakes to avoid
- How do I spot an imbalance quickly?
- When should I remove an order block from my watchlist?
- Can this work on any timeframe?
- What’s the difference between a stop-hunt and an inducement?
Why picking the right order block matters
Multiple order blocks show up on every trending chart. Choosing the wrong one can mean stops hit and losses, even when the overall trend is correct. The trick is identifying which zone is a genuine institutional-level demand (or supply) zone and which zone is a trap designed to lure retail traders in. I call that trap the inducement zone.
What is the inducement zone?
The word inducement literally means something that persuades or influences someone to act. In price action terms, an inducement zone looks like a great entry to most traders, but it is weak. Price often revisits it and breaks through, handing losing trades to those who entered there. The true, strong zone lies beyond that inducement — usually where institutional orders actually live and where price will reverse strongly.
Core signals: liquidity and imbalance
Two simple concepts let you separate the trap from the true order block:
- Liquidity: Areas where stop losses and clustered orders exist. Institutions hunt these before moving price.
- Imbalance: Zones on the chart that have not been tested — raw, one-sided moves with little or no retracement.
If an order block has an imbalance below it, price will naturally want to test that imbalance. That desire creates pressure to break the nearer order block first, turning it into an inducement.
The inducement strategy — step by step
- Identify the trend. In an uptrend, look for higher highs and higher lows. In a downtrend, reverse the logic.
- Mark potential order blocks or demand zones created during the trend.
- Look below each zone for imbalances. If an imbalance sits below a nearer zone, that nearer zone is likely an inducement and can be removed from consideration.
- Compare how each zone behaved when price tried to make a new high (or low). If a zone only barely scratched a previous high, it likely lacked strength.
- Favor the order block that actually produced the strong breakout or cleanly reclaimed the structure — that is usually the true zone.
Real trade walkthrough
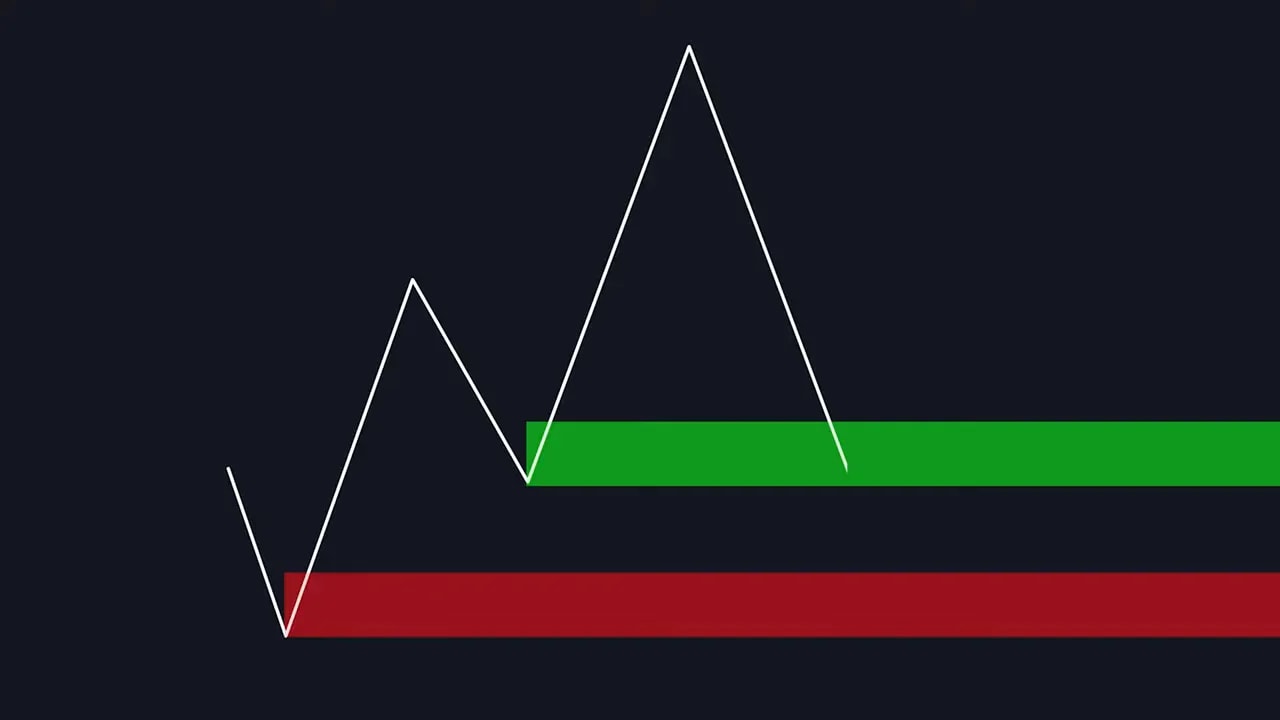
Imagine a clean uptrend with three potential demand zones: zone one (nearest), zone two (middle), and zone three (lowest). At first glance the lowest zone may look strongest simply because it’s the furthest down. But look for imbalances and how price behaved when attempting to break the previous high.
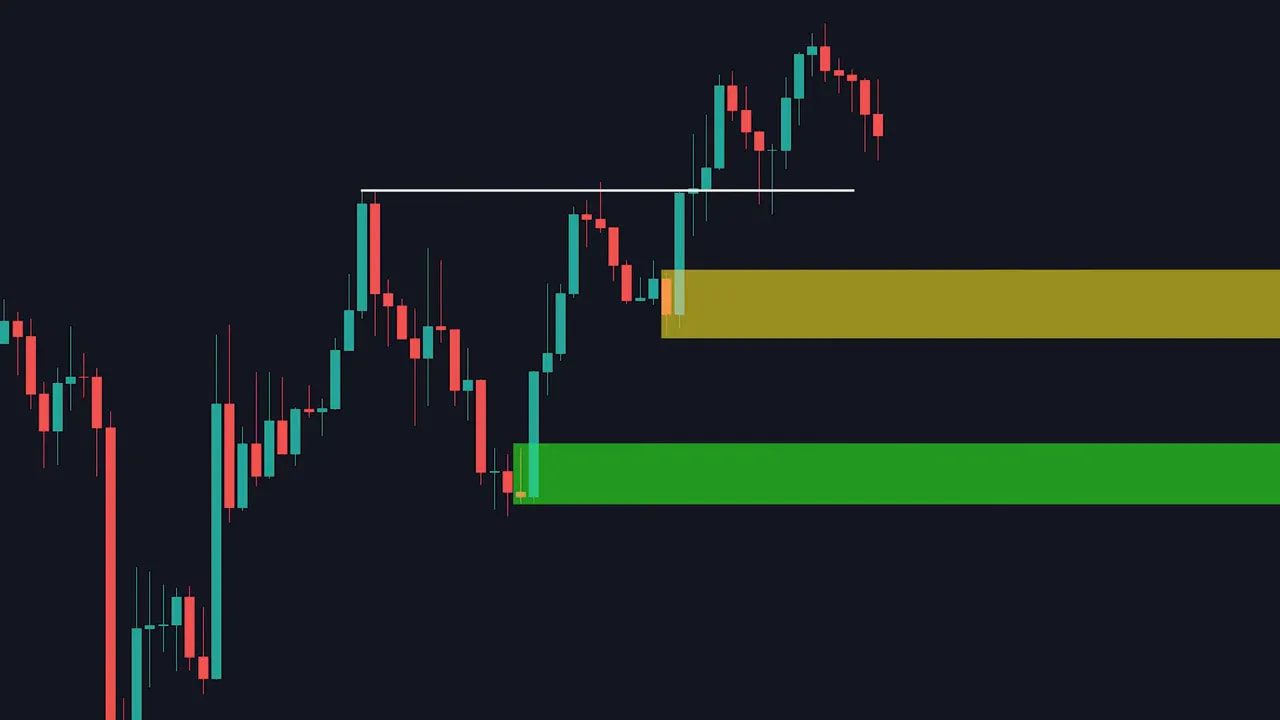
In the example, zone one can be eliminated because an imbalance sits directly below it — price will likely dip to test that imbalance, breaking zone one first. Zone three, the lowest, also appears suspect: price only barely cleared the prior high when it approached that level. Zone two, the middle zone, is the one that actually produced the clean break of structure and the sustainable bullish move. That makes zone two the true order block. The plan is simple: wait for the inducement (zone one) to be broken, then let price move into zone two, drop down to a lower timeframe for confirmation, and enter on a structural shift back to the direction of the trend.
Lower timeframe confirmation and trade management
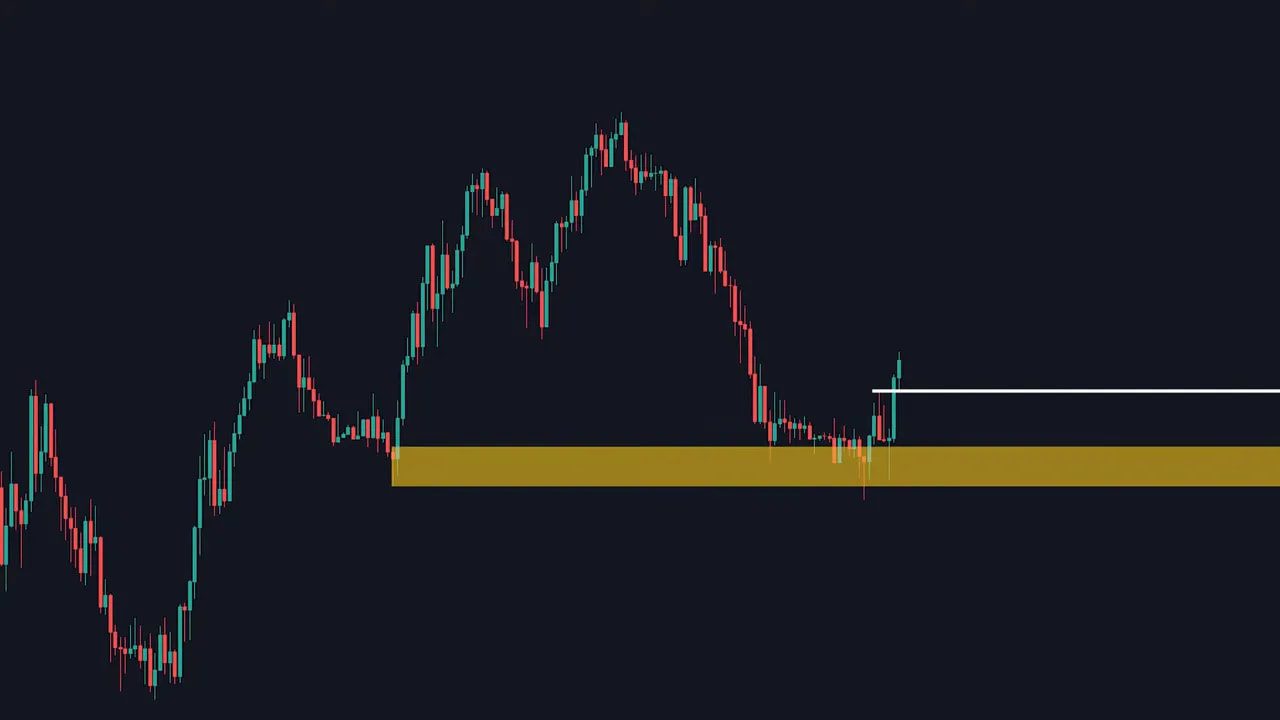
Once price reaches the true order block on the higher timeframe (for example, 1-hour), switch to a lower timeframe (for example, 15-minute) to confirm entry. Typical confirmation steps are:
- A break of structure indicating a shift from short-term down to up.
- Price reaching an imbalance on the lower timeframe and showing rejection or order absorption.
- Entry at the imbalance or after a clear confirmation candle.
Set stop loss below the relevant low (the lowest point that would invalidate the structure) and take profit at the previous swing high or other logical resistance.
Execution checklist
- Trend verified: Higher highs and higher lows for longs (or opposite for shorts).
- Inducement identified: A nearer zone with an imbalance below it or weak price reaction.
- True zone selected: The zone that created the real breakout or moved price strongly.
- Lower timeframe confirmation: Break of structure and imbalance test on the lower timeframe.
- Stops and targets: Stop below invalidation low, target at prior high or measured resistance.
Common mistakes to avoid
- Assuming the lowest order block is automatically strongest. Imbalances and price action tell a different story.
- Jumping in on the first nearby zone without checking for untested imbalance below it.
- Skipping lower timeframe confirmation. Higher timeframe zones need fine-tuning before execution.
- Using arbitrary stop placement. Place stops where structure is invalidated, not where they “feel” safe.
How do I spot an imbalance quickly?
An imbalance looks like a swift directional move with little retracement — a gap in the order flow. On a price chart it appears as a one-sided candle run or a clear run-away move leaving a thin area of candles underneath. Mark those areas: price often returns to test them.
When should I remove an order block from my watchlist?
Remove it when you see a strong imbalance below it or when price has already shown weakness at that level (e.g., it was broken or barely held during an attempt to make a new high). If you can identify a closer inducement that institutions will likely hunt first, you can remove the nearer block.
Can this work on any timeframe?
Yes. The concept of inducement, liquidity, and imbalance applies across timeframes. Use a higher timeframe to mark the order blocks and a lower timeframe for precise entries and confirmations.
What’s the difference between a stop-hunt and an inducement?
They are related. A stop-hunt is an action: price moves to clear clustered stops. An inducement is the zone or setup that draws traders into placing those stops in the first place. In other words, inducement is the bait; the stop-hunt is the bite.
