

A single on-chain indicator has historically marked Bitcoin’s cycle bottoms with remarkable precision. If you had followed just that one tool over the past five years—buying when it signaled buy and selling when it signaled sell—you would have seen a theoretical return of 5,142%. Below are three long-term, battle-tested tools that help identify discounted entry zones and likely tops so you can make more confident trading decisions.
Table of Contents
- Why wallet-level profit and loss data matters
- Tool #1 — MVRV Z-score (Glassnode)
- Tool #2 — Bitcoin Power Law Corridor (TradingView Supercharge)
- Tool #3 — Bitcoin Cycle Master (TradingView)
- A simple long-term playbook
- Key caveats
- FAQ
Why wallet-level profit and loss data matters
Markets move on fear and greed. When most wallets are in profit, greed tends to dominate and tops often form as traders lock in gains. When most wallets are underwater, fear reigns and bottoms become attractive buying opportunities. Tools that measure realized profits across wallets give you a statistical read on crowd psychology rather than relying on price action alone.
Tool #1 — MVRV Z-score (Glassnode)
The MVRV Z-score is an on-chain metric that compares market value to realized value to estimate how rich or cheap an asset is relative to where most holders bought. It effectively tracks the profit ratio of longer-term holders and highlights extremes of greed and fear.
How to use it
- Green zone: Historically marks cycle bottoms. Consider aggressive accumulation when the MVRV line touches this zone.
- Red zone: Marks extreme profit-taking by long-term holders. Start trimming or closing positions as the indicator enters this area.
- This is a long-term signal. It won’t trigger every week, but when it does, it often marks cycle-changing moves.
- Apply the same logic to other coins with sufficient on-chain data (Ethereum, Solana, Tron, etc.).
Tool #2 — Bitcoin Power Law Corridor (TradingView Supercharge)
The Power Law Corridor overlays logarithmic channel lines that historically act as strong support and resistance across full market cycles. Viewing the chart on a logarithmic scale is key because it maps percentage-based moves more naturally.
How to use it
- Switch the chart to logarithmic view to see the corridor properly.
- Bottom green line: Has often acted as the cycle low. Buying near this line is a low-risk, high-upside strategy.
- Top red line: Historically corresponds with cyclical tops, but does not guarantee the exact highest price—use it to become cautious and scale out as price approaches.
- Use this indicator to time entries and to gauge when to tighten risk or take profit as price approaches the upper corridor.
Practical note: these corridor lines are excellent for timing big-picture allocation shifts, not day trading. If you prefer alerts and real-time updates when price approaches these structural levels, a reliable alerting tool or a crypto signals service that watches multiple indicators can save you time and reduce emotional decision-making.
Tool #3 — Bitcoin Cycle Master (TradingView)
The Cycle Master indicator plots likely cycle terminal points. When configured to show only the terminal price line (many traders color it bright yellow for visibility), it has a strong track record of flagging tops.
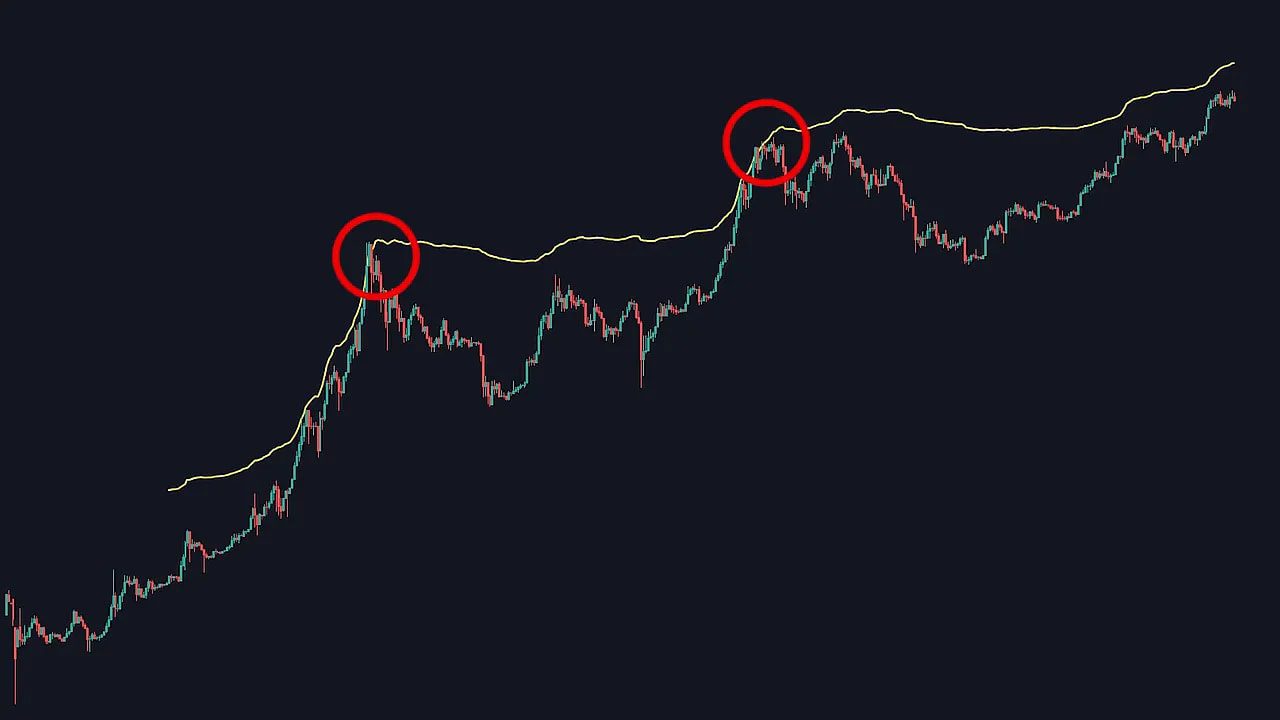
How to use it
- Add the indicator and in settings uncheck everything except plot terminal price.
- Combine Cycle Master with the Power Law Corridor for higher-confidence signals: when the yellow Cycle Master line aligns with the corridor’s upper resistance and on-chain MVRV is elevated, that confluence is a strong warning that a top may be forming.
- Cycle Master tends to be a long-term top indicator—great for deciding when to materially reduce exposure.
A simple long-term playbook
- Watch the MVRV Z-score for deep green-zone readings. Accumulate into positions on these readings.
- Use the Power Law Corridor to confirm structural support and resistance. Buy near the corridor bottom; tighten stops as price moves toward the upper corridor.
- If Cycle Master signals a terminal price near the corridor top and MVRV is in the red zone, scale out of positions and consider securing profits.
- Manage position size, use stop-losses, and avoid betting everything on a single signal. Combine indicators for confluence, not isolation.
For active traders who want notifications when multiple long-term signals line up, a dependable crypto signals service that monitors on-chain, technical, and cycle indicators can deliver timely alerts so you do not miss key entry or exit windows.
Key caveats
- These are structural, long-term tools. Signals may only appear once every few years.
- No indicator is perfect. Use risk management, and do not treat any single signal as a guarantee.
- Backtest logic on different timeframes and across different assets before committing large capital.
FAQ
Are these indicators guaranteed to work every cycle?
No. They have a strong historical track record but are not foolproof. Market structure, macro shocks, or new participants can alter behavior. Use them as high-probability tools, not certainties.
Can I use these tools for altcoins?
The MVRV concept and cycle/channel ideas apply best to assets with enough on-chain history and liquidity. Ethereum, Solana, and other major tokens often produce meaningful signals. Smaller altcoins may not have reliable realized-value data.
How often will these tools give signals?
Rarely on short timeframes. Expect major buy or sell zones a few times per multi-year cycle. Their rarity is part of their power—when they trigger, the moves tend to be significant.
Do I need paid subscriptions for Glassnode or TradingView?
Basic access may be free, but advanced features and real-time alerts usually require paid plans. Consider whether you need live alerts or deep historical data when choosing a subscription.
How can I get notified when multiple indicators align?
Use TradingView alerts, Glassnode notification features, or a curated crypto signals service that monitors confluence between on-chain and technical indicators. Combining automated alerts with your own rules gives the best balance of speed and control.
